Monday, 3 February 2014

Clare's White Chocolate and Apricot Hot Cross Bun Recipe


    This is a recipe requires 3 rises before being baked. It is well worth starting this recipe in the morning.

    Ingredients

    500g strong white bread flour
    10g salt
    75g caster sugar
    10g instant yeast
    40g unsalted butter, softened
    2 medium eggs, beaten
    120ml warm whole milk
    120ml cool water
    150g white chocolate cut up into chunks (a little bigger than chocolate drops)
    120g dried apricots, chopped until into six pieces
    2tsp ground cinnamon
    1/2 - 1tsp ground cloves
    1/2 - 1tsp ground cardamom (or warm milk with crushed cardamom pods and then sieve as I found this hard to find in the shops)
    2sp ground nutmeg


    For the Crosses

    75g plain flour
    75ml water

    1 egg beaten

    For the Glaze

    7 apricot jam with 1tbsp boiling water
    Or
    2tbsp caster sugar mixed with 2tbsp boiling water

    Instructions

    1) Put the four into  a large mixing bowl. Add  the salt and sugar to one side of the bowl and the yeast to the other side. Add the butter, eggs, milk and half of the water and turn the mixture around with your fingers. Continue to add the water, a little at a time until you have picked up all of the flour. You may need a little more water or have a little left over, this will depend on your flour. You want a soft dough  but not a soggy dough.

    2) Tip the dough onto a lightly floured surface and begin the knead. Keep kneading for 5 - 10 minutes until the dough is silky smooth and feels soft with a slight shine. You will know if I is kneaded enough if you pull a bit of dough off and do the window pane test (see pic).  Stretch the dough between your fingers to form a square. If you can se the light though the dough it has ben kneaded enough. If he dough is tearing before you can make a window of dough continue kneading.

    3) When the dough is silky soft and smooth, put it into a lightly oiled large bowl. Cover with a tea towel or cling film, and leave to rise for at least an hour or until doubled in size. I tend to rise mine for about 2 - 3 hours at room temperature.

    4) After the first  rise, tip the dough onto a lightly floured (or oiled) surface, scatter  the spices, chocolate and apricots on top of the dough a bit at a time and knead in until well incorporated and even.  Put back into the oiled bowl (might need to reapply a little oil) and leave to rise covered in cling film or a teas towel for a second time. This rise will take a little longer than the previous rise as it is having to lift up all of the fruit and chocolate.

    5) After this rise, fold the dough inwards repeating until the air has been knocked out. Divide the dough into 100g pieces and roll into balls. To make knead balls you want to fold the dough from the outer edges into the center. Then flip the ball over and use the base of your palms to pinch he bottom of the dough, sealing the edges and making the outer skin of the dough ball tense. Check out this video for instructions! http://www.youtube.com/watch?v=KRk96GA_GF0


    6) Place each dough ball onto a baking tray covered in baking paper. Place them about 2 - 3cms apart so that they will just touch one another when they have proved (risen in their final baking shape).

    7) Place the baking tray in a poly-bag or two so the dough doesn't form a tough skin while rising. Try to keep the bag from toughing the dough. Leave the dough to rise one final time. When they are ready to go in the oven they will be twice the size of the original balls.

    8) Mid way through this rise put the oven onto 200'C to get hot before baking, the best bread goes into a really hot preheated oven.

    9) When the dough balls are big enough for cooking (don't rush this stage or they will be nasty and dense!) mix up the  plain flour with the water and make a paste. Put this into a piping bag (if you don't have any make one using baking paper like this http://www.bbcgoodfood.com/technique/how-make-piping-bag or I tend to use a sandwich bag with a snip in a corner). Then pipe in long lines across the touching buns to make the crosses.


    10) Finally whip up an egg, add 1tbsp cold water and mix it in. Then using a pastry bush (or old clean paint brush), brush the egg wash over the buns, trying to avoid the crosses as best as possible. This will give the buns a lovely colour in the oven. Leave in the oven for 15 - 20 mins.

    11) While the buns are cooking, mix up the glaze, if you are using apricot jam, mix it with 1tbsp boiling water and sieve it has bits in it. Apricot glaze ends up very very sticky. For a sweet but far less sticky glaze mix up caster or granulated sugar with hot water, make sure all of the sugar is dissolved. The moment the buns come out of the oven use a clean pastry brush or old clean paint brush and brush over the glaze. Leave to cool or devour!


Monday, 13 January 2014

Bread Beautiful Bread

A new year a fresh start and I am taking that mantra with my bread making! In the past year I have learnt:

1) Fresh yeast is not worth buying, goes off too quickly and is not for me.
2) Sourdough is fun, creative, my husband loves it but is a lot of effort.
3) Old large tubs of fast action yeast is not going to work well.
4) Fresh fast action yeast is indeed amazing.
5) My kitchen aid makes me nervous after two break downs... I will post on this later.
6) Kneading by hand is fun and rewarding but still the kitchen aid is easier.
7) Make sure you have the right size loaf tin... very important to avoid brick like loaves!


So we a renewed sense of purpose I have been researching how to perfect my bread.  Yesterday I made an amazing loaf if I don't say so myself. I made a white loaf with the normal Paul Hollywood tin loaf recipe:

- 400g strong white bread flour
- 8g salt
- 7g fast action yeast
- 25g butter
- 250ml cool water


Now what I did differently was to hold out with my kitchen aid through the grinding noises and the head bouncing and let it knead it fully rather than to finish it off by hand. I also added less water to begin and more to pull i together rather than adding more in. I believe that as I didn't add anything to the dough like extra oil through kneading that is why it tastes so good. It is soft and moist where as lasts week loaf was dry and oily. Don't get me wrong my last load didn't drip with oil, but it had that texture that bread and cakes tend to have when oil has been added, the dry larger hole texture that oil in recipes bring.

I also read about glazes and topping on Gina's blog Home Joys and mixed up an egg (white and yolk with no water) and brushed this onto the bread before going in the oven and scattered on a mix of sesame seeds and black onion seeds. I had also wanted to slash he top to make it bloom in the oven but my knives are all fairly blunt so didn't want to ruin my bread and squish all of the air out of it trying. I think I will purchase a bread blade at some point, perhaps after starting a sour dough again. 

I put a tray of cold water in the bottom of the oven to make the oven steamy as this is meant to improve the shine. If I am honest I am not sure I do notice the difference with this one. Perhaps I need to do one with and one without of the same dough to test it!

Finally I melted some butter (homemade!) in the microwave and brushed this onto the hot bread as I came out of the oven.


Doug and I will eat this at work for lunch with homemade soup, Carrot and Cumin. The recipe for this came from the New Covent Garden Food Co. A Soup For Every Day Book.


Sunday, 12 January 2014

New Years Resolutions

So that time of year has arrived where I vow to improve myself this year. Now I am not a breakfast type of person which is strange as I was brought up to eat breakfast every day. So this New Years resolution is to eat breakfast every day! 

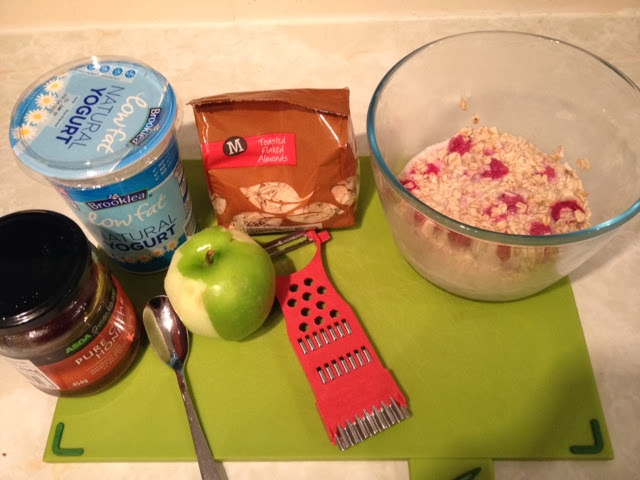
My breakfast of choice so far has been Bircher Musili or overnight oats. My mum was given the recipe originally by a friend about a decade ago and I used to make it at Uni to power myself though the exam period. It is yummy, healthy and as low releasing energy but be warned it isn't too cheap. So here it is!!

1) Mix 100g jumbo oats with 200ml milk and a handful or two of frozen raspberries. Mix up and leave to soak overnight or at least an hour in the fridge.


2) In the morning, take the oats out of the fridge and grate an apple into the bowl with the oats (I peel mine too) before hand).


Then mix in a handful or two of toasted flaked almonds, about 100ml natural yogurt and a teaspoon of honey to taste. And voila, Bircher Musili!!


I like to put my Musili into washed out jam jars to take to work to eat on the way to work! 

Saturday, 27 July 2013

Spelt Roasted Garlic Focaccia

Today I am trying to make a roast garlic focaccia for mum from spelt flour. This is the test run which I will force feed to my other half! If it gets approval from Doug then i'll recreate it for my lovely mum! 


When I first started making it I was dubious as spelt flour has a weaker than normal gluten strands when it has been kneaded. So I added a little more oil and water than called for to increase the development of glutenin in the dough. You can tell this worked as my dough the. Looked more like a pair of my granny's knickers once it was kneaded than bread dough! I also added a little more yeast than necessary as my yeast is not very fresh any more and is a little inactive at time and also to try get some air in what is normally a denser loaf.


It was almost more elastic than my dough is with strong white bread flour!!

So I have greased up a square container and left the dough to rise. I am going let it rise and fall perhaps 3 times over the period of the day to really get some air in the dough which should help the fact that  spelt bread is often dense. Fingers crossed!!


Friday, 29 March 2013

Pandora and chicks!

I have had a pretty rubbish day today... The stress and strains of the past 6 months are finally being released! But on a positive note I did find my favourite pandora charm which my mum gave me. It's a cupcake!! I found it under the bed, I don't know why I didn't look there originally!!


And I also sewed some Easter cards for mum and dad, my aunt and uncle, brother and his gf and my darling husband! I'm quite pleased with them providing I whipped them up at the last minute!!


Thursday, 21 March 2013

Graze Box!

Everyone has a guilty pleasure, or so I tell myself! And mine other than loving singing to Glee is snacking on finger food... Olives, popcorn, munch seeds. You get the idea! So as you can imagine the Graze boxes have naturally appealed to me! So my husband came home with a voucher if which there are many. Normally I would dismiss the idea of trying new things where a freebie is offered to entice you but I cracked the other day and dared to be daring! So I went online and orders my graze box. There was loads to choose from, not to much to be overwhelming but enough to offer variety to regulars. I selected what were my favourites (or what I thought would be) and ticked items I wanted to try very soon in hope my box would contain my choices. So when it arrived I was delighted my four favourites were there! I can't wait to try it tomorrow at work. I unfortunately can't keep it going as its just too expensive but if it ever decreases in price I would defiantly do it regularly based on what I have seen never the less tasted!


Friday, 1 March 2013

Photo editing

After finding a blog with beautiful photos I have decided I want to try editing my photos a little more than normal. So here are my first few:


Thursday, 22 November 2012

Christmas is on it's way!

Whoop Christmas is on it's way! My colleagues put up the Christmas tree today which was ordered from Homebase and got delivered yesterday. We aren't decorating it until next week, thank goodness! I think I would get bored of Christmas otherwise!

I have found a new website I like:  http://folksy.com/

On Folksy I found lots of nice gifts, decorations and cards I would like to make. Although my only concern is that making these things can often come out being more expensive than buying them!


I love these felt decorations and the heart garland. Felt is so simple to work with and cheap.

I really like the birds and the reindeer!


Also I think this pop up card is cute and fairly simple.


Although how you would neaty cut the crinkles into the bottom I don't kneweven with crinkle sissors!

This card looks more achievable but again small details worry me like how to contro my machine well enough the mak ethe holly or the wiggle lines. I definatly would turn of the feeder.


My favourite decoration from the website however is this reindeer head made from willow!


Ho ho ho!

Only 32 days, 7 hours, 11 mins and 3 seconds until Christmas!


Friday, 2 November 2012

Amazon Addict

I have recently discovered the amazingly cheap goods on Amazon! I have purchased a phone case recently from there for the bargain price of £3 only to discover it didn't fit the screen protector underneath. I was pretty disheartened! So after buying a new more expensive case from a service station I took another look on Amazon. I ordered a phone sock  for a few quid :-) and all of my advent calender fillers for my other half. I also managed to get 5 back and front phone screen protectors for £1.30... now that is a bargain. Having seen them for £7+ in the past I was sure they didn't cost anywhere near that to produce and they are so disposable! Although a handy note is if you put it on and there is dust caught underneath, stick some sellotape on your fingers, lift up the protector and sellotape the dust away and lay it on again. Sorted! I managed to fix an ipad screen protector by sellotaping the whole thing!


A few years ago I made my other half an advent calender by sewing 25 mini stockings and writing numbers on them with fabric paint and then hanging them on a ribbon. Each one is about one and a half credit card lengths and slightly narrower than a credit card width. I normally put a few sweets or chocolate in each one, a sentimental script, whether a memory and a photo, a line or two from the Christmas story or a joke. I also put in a little gift every Sunday. I find it quite hard normally to find relevant gifts and keeping the total advent calender price under £20 but this year I have managed to get all of his presents before November had even started! All of the presents came from Amazon and they got delivered today. I am really impressed with them! Yay just the rest of my shopping to do now!

Thursday, 1 November 2012

Crumpets


Last night I decided to make crumpets! I was craving them all day and said this to my mum who said give it a go as my brother had had home made ones at Chatsworth last week and they were incredible! So I decided to drop in at Morrisons on the way home and buy some Egg/Crumpet rings. In the past I have tried an upturned cookie cutter but it wasn't so effective... lots of leakage.

the mix was simple, so flour, yeast, sugar, warm milk and cold water to get it started. I left it in the airing cupboard (I know the flavour wouldn't be as good for this but i was short of time) and cracked it out an hour later. It should have taken two hours at room temperature. I mixed in some bicarbonate of soda and some salt and left it a further 10 mins. 

while waiting I heated up my pan and greased up the rings. The first two I made were too big. I filled the rings three quarters full and the resulting crumpets were dense, and too big and i felt not cooked enough. So I decided to try another time only filling them about 2 cm full. This worked out perfectly. Holes appeared on the top and the bottom was well cooked but not burnt. They tasted lovely. I tried them this morning with butter and chocolate spread. I love the way that the butter oozes through the chocolate spread as it is cut into. They tasted amazing, the only complaint I can make is I can taste the bicarb. I don't think I put enough salt in (had to use a mill rather than fine salt which I had run out of) and maybe this effects the flavour of the bicarb? Either way I will probably use less bicarb next time so I cant taste it.

Nom nom!
My crumpet dough after rising

The crumpets cooking in the pan
The final yummy products


Monday, 29 October 2012

Gingerbread House

With the Christmas period being talked about, the shops putting their decorations up and the in laws discussing when we are to visit over Christmas I can't help but think about what my Christmas bakes will be this year! My husband has already jumped in with a suggestion of a yule log (something I was hoping to make anyway), however having watched the British Bake Off Gingerbread construction competition I have decided I shall master the art of making gingerbread houses. Now I never start with the basics...a mistake perhaps! So this year I do plan to practice by making my own house as a gingerbread look alike. Once I have mastered this I plan to make my family home out of gingerbread for Christmas. My Mum and Dad are hosting a big Christmas gathering for us and our Aussie family who are coming over for the first time in many years. There will be about 14 of us tops and so it would be a perfect time to crack out a beautiful gingerbread version of where Christmas is to be hosted! Mum and Dad live a beautiful barn conversion in Derbyshire which I can imagine being "cutified" for the purpose of baking!

I have been thinking about what I shall use for each component. Making the structure I can't imagine being too hard. I will take photos of each sections and roughly work out the ratio of height to length for each section of the house. What concerns me is what to make the roof tiles of... cereal, chocolate buttons, homemade biscuits. What about the windows? I could crack up hard boiled sweets and melt these in the oven in my gingerbread "window frames" to make see through windows, or perhaps I should I just paint on some white icing? What shall I bind the gingerbread with, icing or caramel?

What I have come to realise about this baking ambition is that my gingerbread houses are going to require much planning especially if I want a professional looking house rather than one of the instant pack houses from the supermarket!


Over-the-Top Gingerbread Houses: First Family Holiday House
I love the detail of this house but do not expect mine to look anywhere near as good as this one!
gingerbread house
This is simple and sweet, if mine looked like this I would be pleased.
This is one of my favorites, It is so sweet and beautifully done.
Again, another detaild gorgeous house, but I feel it is missing snow! I like the detailing of the wooden paneling the best. My parents home is made of large blocks of sandstone which I would like to think I could replicate.
Again, another one which captured my imagination for the detailed textures. Beautiful.
Unusual Gingerbread House 2
This one was the first one which made me want to do this. If I could make mine look as sweet and tidy as this one I would be pleased.
Mini Gingerbread House Recipe
If all else fails I will do a simple design like this sweet little house. I like the ice cream cones being used for trees.


Sunday, 16 September 2012

Bread Plait 3 Strand

Today I had fun making three new things with my kitchen aid. I started with Chapatis to eat with lunch and for tomorrow at work. They turned out well although tougher than the ones I like. Better than last time I attempted them though. Then I made the dough for a three strand bread plait. I left it to rise then plaited it then left it to prove. I made it using honey and seed bread flour from our local farm shop. The only problem was when I put it into the oven and set the alarm on our new combo timer and thermometer device I forgot to press the start button after setting the time so my bread came out rather burnt having been in the oven for 30+ mins rather than 20. Oh well below is a picture of it looking gorgeous before I burnt it! After cutting the brown crust off the inner bread and base was still amazing!! I dipped it in oil and raspberry vinaigrette and Doug had his with Strawberry and Vanilla jam. I also helped Doug to make garlic pasta Doug in the kitchen aid. As a garlic fiend I couldn't resist the smell of the dough. Mmm!

Wednesday, 12 September 2012

Fishy fishy

Whoop my boss let me put a fish tank on my desk at work! I wanted to put our spare fish tank from home on there. I really didn't think he would say yes! I think he was more amused I had asked than anything else!! I have always wanted a fish tank at work! I have had sea monkeys at work before but that was as good as it got! Needless go say they were pretty boring to look at!

I work better when I feel at home in my environment. When I have to move desks or use someone else's desk I always struggle to settle into my work!

I set up my tank this morning and bought done sand (first time since we got out first gold fish a few years ago) and a new filter and two plants. I also bought 4 black phantom tetras to get the tank set up. The sand has made the water very cloudy but that will settle down by the end of the week!

When it is set up fully I would like to get a male Siamese fighter fish and a pleco.

Hollywood Bread Attempt 1.2

Yesterday when I got back from Swindon I cracked out (opened kindle app) the book I bought on bread making by Paul Hollywood. I decided as I had mozerella in the fridge which needed using up to try the mozerella and tomato bread. It was about like a focaccia just more dense with a crispier top. It was by no means a pretty bread but I did taste amazing. The dough scared me as it was so wet I didn't quite think I would be able to do much with it. but wow did It taste amazing. I sent Doug into work this morning with the bread filled with slices of mozzarella and large plum tomatoes and use butter to stop the liquid from the filling from making the bread soggy. Thinking about it I wish I had put pesto in there too. Oh well next time! I took some into work too and have been dipping it into olive oil and vinegar.

I had forgotten to add the last 1/4 of water first and got a tough dough scrapped it thus why this one is called version 1.2!!

Tuesday, 11 September 2012

Hollywood Style

Eeek! I am so excited to get home!

For the last two days I have been working from Swindon. Last night whilst sat in my hotel room on my lonesome I was watching Great British Bakeoff, one of my favourite programmes. After watching the breadmaking episode and watching the contestants battle with a delightful octopussy looking eight piece plait I decided I would like a go and improving my bread making skills.

I went onto the kindle sight and looked at reviews for Paul Hollywoods books. He has two out; 100 great breads and how to bake. The book 100 great breads had a lot of negative reviews so I decided to go for how to bake. Most of his recipes are breads rather than cakes which put me off initially. I checked the price on the ibooks apple store, it came up as £19.99 :-O and then I checked it on kindle, £7.99. No competition!

I have now downloaded the book and the recipes look amazing. My husband has volunteered himself as a willing taste tester not surprisingly as he loves all things bread related! So my new challenge is to have a go at baking some exciting breads! I cant wait to get home and get started.


Friday, 7 September 2012

First use of kitchen aid

Last night I used my kitchen aid for the first time. The first thing I made was focaccia bread. My husband loves focaccia bread so thy is why I chose this! I divided the dough into three. The first two dough sections I turned into normal focaccia bread with rosemary and salt topping. The final one I experimented with and decided to make a stuffed focaccia. I used mozzarella and sun dried tomatoes in the middle and my goodness did it taste good! It was meant to be for Dougs lunch today but we ended up eating it warm alongside our dinner or truffle butter and pasta which we bought back from Italy. Interestingly I made two lots of truffle butter. The first batch I put into a plastic Tupperware tub and the second one I rolled into a cylindrical shape in some grease proof paper and left both in the fridge. Whilst I was away on honeymoon the one in the Tupperware tube became mouldy but the one in paper was fine. I have also experimented making truffle oil before but I found that the truffle went a little furry after a few weeks so the truffle butter in paper seems to be the best way to preserve the truffles once the tub is opened.


The second thing I made using my kitchen aid was the layer cake I saw online. It turned out less pretty than the one online but tasted good. I made a few changes including using delia smiths recipe, making white chocolate icing and putting raspberry jam on between every layer. I found my cake leaned a little. It wasn't so bad for a first attempt at a multi layer cake but I would definitely want it to be neater next time!!

Thursday, 6 September 2012

Plans of my first cake

I am planning what cake to make first with my trusty side kick. I have always wanted to do a cake with more than two layers and I quite fancy something colourful. At first I thought about a Battenburg as my colleague really loves them. However now I think I will make this cake as it just looks so cute!

It is a Martha Stewart pastel layer cake

http://www.marthastewart.com/287207/pastel-layer-cake#

I will leave the Battenburg for another day!

My New Sidekick

Doug and I decided whilst we were away on our honeymoon that we wanted a new TV and a Kitchen Aid so that we could get rid of all of the kitchen gadgets and replace it with one mighty gadget!! So yesterday with John Lewis vouchers in hand we headed over the the kitchen section of John Lewis. I fell for a metallic blue kitchen aid. She is beautiful and has been named Betty Blue! Doug is a big pasta fan so we also bought the pasta cutter extension and the vegetable and fruit grinder box set. A lot of money later we walked away what looked like the kitchen department of John Lewis and frazzled expressions!! I am a little dubious of our kitchen aid as it cost the same as I spent on my wedding dress. Don't panic, my dress was relatively cheap for a wedding dress but still this is a lot of money to hand over for a kitchen instrument. I hope that it's benefits and uses are worth the costs!! Tonight I want to make my other half some focaccia using the kneading hook!


Thursday, 30 August 2012

Honeymoon


So, Mr E and I got hitched last week. The weather held out for us thank goodness and other than my Grandpa collapsing whilst we signed the register and getting an ambulance called out for him all was ok. After an ECG he was left to enjoy the rest of the day in the hotel bed. The wedding reception was great fun. My old sixth form friends turned up as did my best friend from when I lived in London. Everyone's speeches were great and the guests enjoyed Mr E's bouncy castle!
A success.

Ok in the end I didn't sew my own dress or the bridesmaids. The most action my machine saw was sewing the order of services together. I did however manage to sew in the day when my dress got ripped twice (just the button hole holding the train up)!


- Posted using BlogPress from my iPad
Location:Italy

Sunday, 5 February 2012

Snowcrastination

Happy snowy Sunday! After a failed attempt at preparing for a job interview for next week i decided that i needed a few hours of sewing. I decided to embark on drafting the dress pattern for one of my bridesmaids. The last dress I made was a little small I think for the measurements I had taken although I think I may have gone the other way now! I am using New Look 6776 view D, currently I am on the toile version.

I laid out the dress to photograph and Nala decided to sprawl all over it as I had been ignoring her whilst I sewed!


This is the front of the dress without Nala on it!


And this is the back of the dress.


So now I have finished the toile and need to visit Beka to see whether it fits all I can do now is get back to interview prep. Yawwwnnn.

Oh well I guess I can't sew all day long. Instead I'll sit t my desk with this view :-) trying to articulate why I should have a job I would love, finding relevant examples for the job. I'll keep you posted! Enjoy the snow xx