Monday 3 February 2014

Clare's White Chocolate and Apricot Hot Cross Bun Recipe


    This is a recipe requires 3 rises before being baked. It is well worth starting this recipe in the morning.

    Ingredients

    500g strong white bread flour
    10g salt
    75g caster sugar
    10g instant yeast
    40g unsalted butter, softened
    2 medium eggs, beaten
    120ml warm whole milk
    120ml cool water
    150g white chocolate cut up into chunks (a little bigger than chocolate drops)
    120g dried apricots, chopped until into six pieces
    2tsp ground cinnamon
    1/2 - 1tsp ground cloves
    1/2 - 1tsp ground cardamom (or warm milk with crushed cardamom pods and then sieve as I found this hard to find in the shops)
    2sp ground nutmeg


    For the Crosses

    75g plain flour
    75ml water

    1 egg beaten

    For the Glaze

    7 apricot jam with 1tbsp boiling water
    Or
    2tbsp caster sugar mixed with 2tbsp boiling water

    Instructions

    1) Put the four into  a large mixing bowl. Add  the salt and sugar to one side of the bowl and the yeast to the other side. Add the butter, eggs, milk and half of the water and turn the mixture around with your fingers. Continue to add the water, a little at a time until you have picked up all of the flour. You may need a little more water or have a little left over, this will depend on your flour. You want a soft dough  but not a soggy dough.

    2) Tip the dough onto a lightly floured surface and begin the knead. Keep kneading for 5 - 10 minutes until the dough is silky smooth and feels soft with a slight shine. You will know if I is kneaded enough if you pull a bit of dough off and do the window pane test (see pic).  Stretch the dough between your fingers to form a square. If you can se the light though the dough it has ben kneaded enough. If he dough is tearing before you can make a window of dough continue kneading.

    3) When the dough is silky soft and smooth, put it into a lightly oiled large bowl. Cover with a tea towel or cling film, and leave to rise for at least an hour or until doubled in size. I tend to rise mine for about 2 - 3 hours at room temperature.

    4) After the first  rise, tip the dough onto a lightly floured (or oiled) surface, scatter  the spices, chocolate and apricots on top of the dough a bit at a time and knead in until well incorporated and even.  Put back into the oiled bowl (might need to reapply a little oil) and leave to rise covered in cling film or a teas towel for a second time. This rise will take a little longer than the previous rise as it is having to lift up all of the fruit and chocolate.

    5) After this rise, fold the dough inwards repeating until the air has been knocked out. Divide the dough into 100g pieces and roll into balls. To make knead balls you want to fold the dough from the outer edges into the center. Then flip the ball over and use the base of your palms to pinch he bottom of the dough, sealing the edges and making the outer skin of the dough ball tense. Check out this video for instructions! http://www.youtube.com/watch?v=KRk96GA_GF0


    6) Place each dough ball onto a baking tray covered in baking paper. Place them about 2 - 3cms apart so that they will just touch one another when they have proved (risen in their final baking shape).

    7) Place the baking tray in a poly-bag or two so the dough doesn't form a tough skin while rising. Try to keep the bag from toughing the dough. Leave the dough to rise one final time. When they are ready to go in the oven they will be twice the size of the original balls.

    8) Mid way through this rise put the oven onto 200'C to get hot before baking, the best bread goes into a really hot preheated oven.

    9) When the dough balls are big enough for cooking (don't rush this stage or they will be nasty and dense!) mix up the  plain flour with the water and make a paste. Put this into a piping bag (if you don't have any make one using baking paper like this http://www.bbcgoodfood.com/technique/how-make-piping-bag or I tend to use a sandwich bag with a snip in a corner). Then pipe in long lines across the touching buns to make the crosses.


    10) Finally whip up an egg, add 1tbsp cold water and mix it in. Then using a pastry bush (or old clean paint brush), brush the egg wash over the buns, trying to avoid the crosses as best as possible. This will give the buns a lovely colour in the oven. Leave in the oven for 15 - 20 mins.

    11) While the buns are cooking, mix up the glaze, if you are using apricot jam, mix it with 1tbsp boiling water and sieve it has bits in it. Apricot glaze ends up very very sticky. For a sweet but far less sticky glaze mix up caster or granulated sugar with hot water, make sure all of the sugar is dissolved. The moment the buns come out of the oven use a clean pastry brush or old clean paint brush and brush over the glaze. Leave to cool or devour!


Monday 13 January 2014

Bread Beautiful Bread

A new year a fresh start and I am taking that mantra with my bread making! In the past year I have learnt:

1) Fresh yeast is not worth buying, goes off too quickly and is not for me.
2) Sourdough is fun, creative, my husband loves it but is a lot of effort.
3) Old large tubs of fast action yeast is not going to work well.
4) Fresh fast action yeast is indeed amazing.
5) My kitchen aid makes me nervous after two break downs... I will post on this later.
6) Kneading by hand is fun and rewarding but still the kitchen aid is easier.
7) Make sure you have the right size loaf tin... very important to avoid brick like loaves!


So we a renewed sense of purpose I have been researching how to perfect my bread.  Yesterday I made an amazing loaf if I don't say so myself. I made a white loaf with the normal Paul Hollywood tin loaf recipe:

- 400g strong white bread flour
- 8g salt
- 7g fast action yeast
- 25g butter
- 250ml cool water


Now what I did differently was to hold out with my kitchen aid through the grinding noises and the head bouncing and let it knead it fully rather than to finish it off by hand. I also added less water to begin and more to pull i together rather than adding more in. I believe that as I didn't add anything to the dough like extra oil through kneading that is why it tastes so good. It is soft and moist where as lasts week loaf was dry and oily. Don't get me wrong my last load didn't drip with oil, but it had that texture that bread and cakes tend to have when oil has been added, the dry larger hole texture that oil in recipes bring.

I also read about glazes and topping on Gina's blog Home Joys and mixed up an egg (white and yolk with no water) and brushed this onto the bread before going in the oven and scattered on a mix of sesame seeds and black onion seeds. I had also wanted to slash he top to make it bloom in the oven but my knives are all fairly blunt so didn't want to ruin my bread and squish all of the air out of it trying. I think I will purchase a bread blade at some point, perhaps after starting a sour dough again. 

I put a tray of cold water in the bottom of the oven to make the oven steamy as this is meant to improve the shine. If I am honest I am not sure I do notice the difference with this one. Perhaps I need to do one with and one without of the same dough to test it!

Finally I melted some butter (homemade!) in the microwave and brushed this onto the hot bread as I came out of the oven.


Doug and I will eat this at work for lunch with homemade soup, Carrot and Cumin. The recipe for this came from the New Covent Garden Food Co. A Soup For Every Day Book.


Sunday 12 January 2014

New Years Resolutions

So that time of year has arrived where I vow to improve myself this year. Now I am not a breakfast type of person which is strange as I was brought up to eat breakfast every day. So this New Years resolution is to eat breakfast every day! 

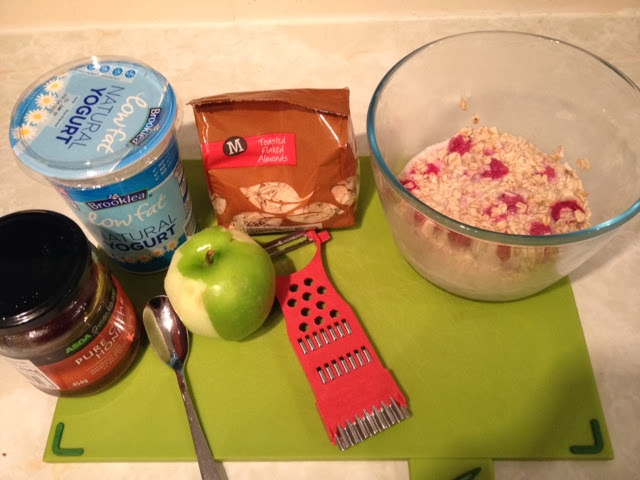
My breakfast of choice so far has been Bircher Musili or overnight oats. My mum was given the recipe originally by a friend about a decade ago and I used to make it at Uni to power myself though the exam period. It is yummy, healthy and as low releasing energy but be warned it isn't too cheap. So here it is!!

1) Mix 100g jumbo oats with 200ml milk and a handful or two of frozen raspberries. Mix up and leave to soak overnight or at least an hour in the fridge.


2) In the morning, take the oats out of the fridge and grate an apple into the bowl with the oats (I peel mine too) before hand).


Then mix in a handful or two of toasted flaked almonds, about 100ml natural yogurt and a teaspoon of honey to taste. And voila, Bircher Musili!!


I like to put my Musili into washed out jam jars to take to work to eat on the way to work!